Developer Guide
Table of contents
- Introduction
- Setting Up and Getting started
- Design
-
Implementation
- Add a calendar item feature
- Mark a task as done feature
- Additional information of an event feature
- Delete a calendar item feature
- Find a calendar item feature
- Print tasks feature
- Print events feature
- Print personal calendar feature
- Prioritize a task feature
- Print prioritized tasks feature
- Print progress feature
- Print suggestions feature
- Print countdown feature
- Saving data feature
- Check the validity of a module code
- Documentation
- DevOps guide
- Appendix A: About the product
- Appendix B: User Stories
- Appendix C: Non-Functional Requirements
- Appendix D: Glossary
- Appendix E: Contact the initial developers
- Appendix F: Instructions for manual testing
Introduction
This section provides an introduction to the developer guide for 25HoursADay.
What is 25HoursADay
25HoursADay is a scheduling app optimized for users via a convenient yet powerful Command Line Interface (CLI) while still having the benefits of a Graphical User Interface (GUI). If you can type fast, 25HoursADay can schedule your tasks and events faster than traditional GUI apps.
Purpose and scope
The purpose of this developer guide is to describe the architecture and software design decisions for the task scheduling application 25HoursADay. This developer guide covers an overview of the program architecture, the logical view of major components, and the mechanism of the functions.
The intended audience of this guide are the developers and software testers of 25HoursADay.
Setting Up and Getting started
This section provides on setting up the 25HoursADay application.
Setting up
Before diving into the project development and testing, here are some essential tools required in this project:
-
JAVA 11.0.8
- Launch your terminal and type "java -version" to ensure you have the correct version number
- If you have no Java installed or different version number, please proceed to this website to download the Java 11.0.8 installer.
-
Intellij IDEA
- If you are new to IntelliJ, please proceed to this website to download and install the IDE.
After installing the required tools, proceed to Github Page and fork the project to your own repository, and clone your fork into your working computer.
Now, Open Intellij
- If you are not in the welcome screen, click
File→Close Projectto navigate to the starting project dialog) - Set up the correct JDK version for Gradle.
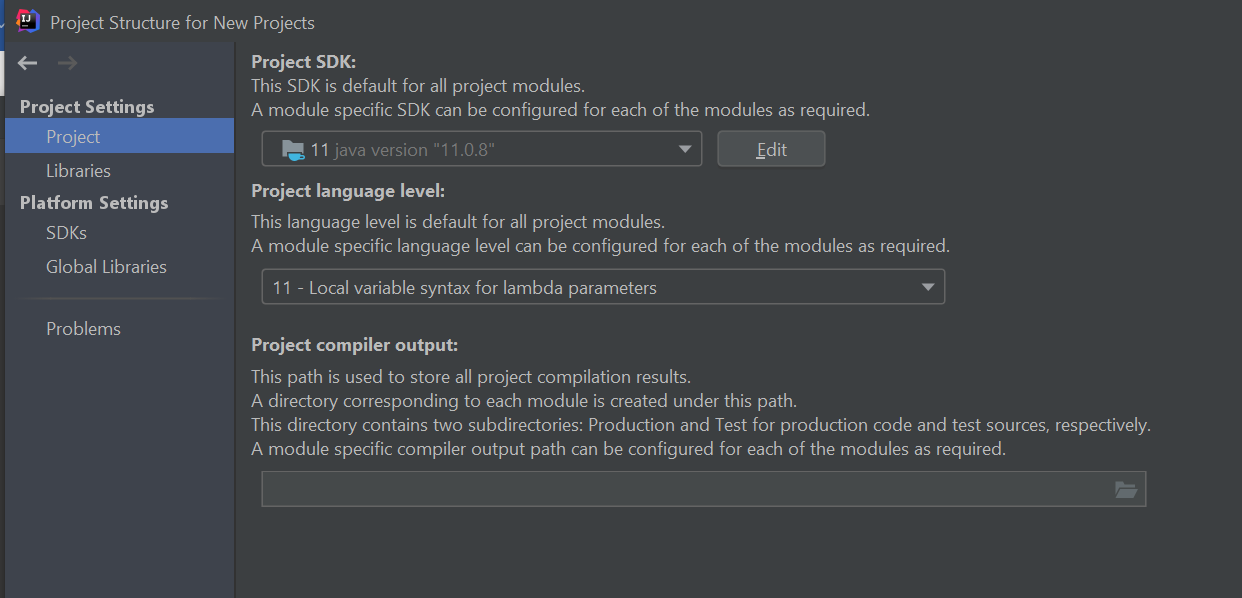
1. Click
Configure→Project Structure for New Project1. ClickNew...and set it to the directory of the JDK - Upon the successful configuration, you should be able to see the following screenshot:
- Lastly, Import the project as a Gradle Project.
- Intellij IDEA by default has the Gradle plugin installed. If you have disabled it, go to
File→Settings→Pluginsto re-enable them. - Click Import Project (or Open or Import in newer version of Intellij).
- Locate the build.gradle file (not the root folder as you would do in a normal importing) and select it. Click
OK. - If asked, choose to
Open as Project(not Open as File). - Click
OKto accept the default settings but do ensure that the selected version of Gradle JVM matches the JDK being used for the project. - Wait for the importing process to finish (may take a few minutes, so get some

 )
)
- Intellij IDEA by default has the Gradle plugin installed. If you have disabled it, go to
-
Verify the set up:
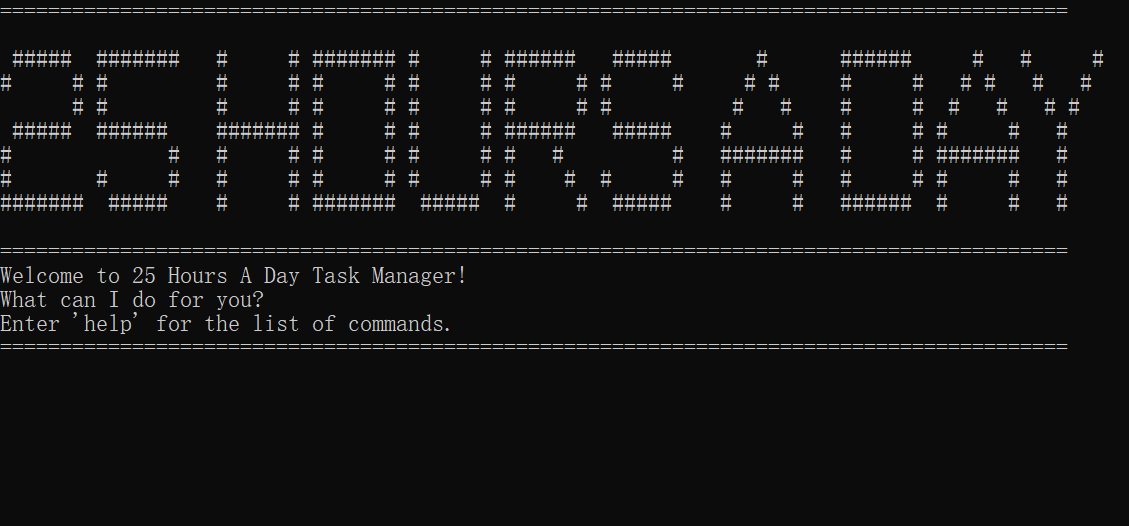
- Run the
..main/java/seedu.duke/Main - Upon a successful configuration, you should be able to see the welcome screen of the project as shown below:
- Run some tests to ensure it is working properly.
- Run the
Getting started
-
Configure the coding style If using IDEA, follow the guide If using IDEA, follow the guide se-edu/guides IDEA: Configuring the code style to set up IDEA’s coding style to match ours.
 Tips: Optionally, you can follow the guide se-edu/guides Using Checkstyle
to find how to use the CheckStyle within IDEA e.g., to report problems as you write code.
Tips: Optionally, you can follow the guide se-edu/guides Using Checkstyle
to find how to use the CheckStyle within IDEA e.g., to report problems as you write code. -
Set up CI This project comes with a GitHub Actions config files (in
.github/workflowsfolder). When GitHub detects those files, it will run the CI for your project automatically at each push to the master branch or to any PR. No set up required. -
Learn the design When you are ready to start coding, we recommend that you get some sense of the overall design by reading about 25HoursADay’s architecture.
Design
This section describes the design overview of the 25HoursADay application.
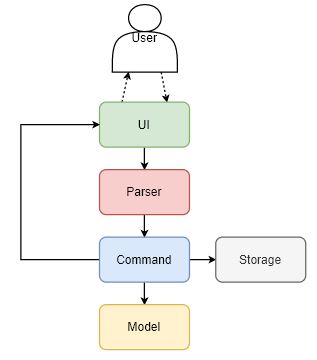
Architecture
The figure below shows the overall design of the application.
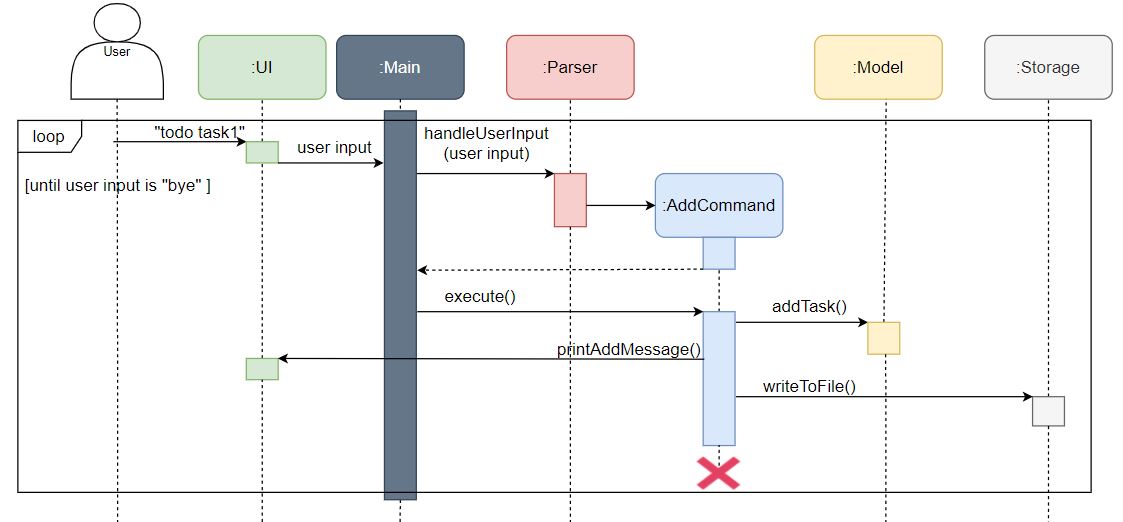
The sequence diagram below shows how the components interact with each other for the scenario where the user issues the command todo.
An overview of each components is listed below.
Ui
The Ui class is responsible for the user interface of the application. It receives the input from the user and prints the results to the user.
Parser
The Parser class is responsible for interpreting the user's input and calling the respective command.
Command
The different Command classes are responsible for receiving the user's input from the Parser class and executing the corresponding commands.
The figure belows shows the class diagram of the command class:
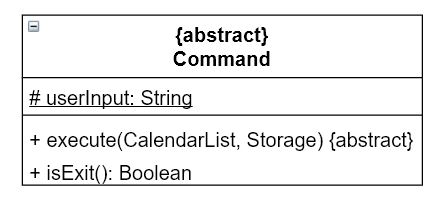
All Command classes inherit from the Command class.
Storage
The Storage class is responsible for reading and writing data to the hard disk.
Model
The model is responsible for holding the data of the application in memory. The figure below shows the structure of the Model in this application.
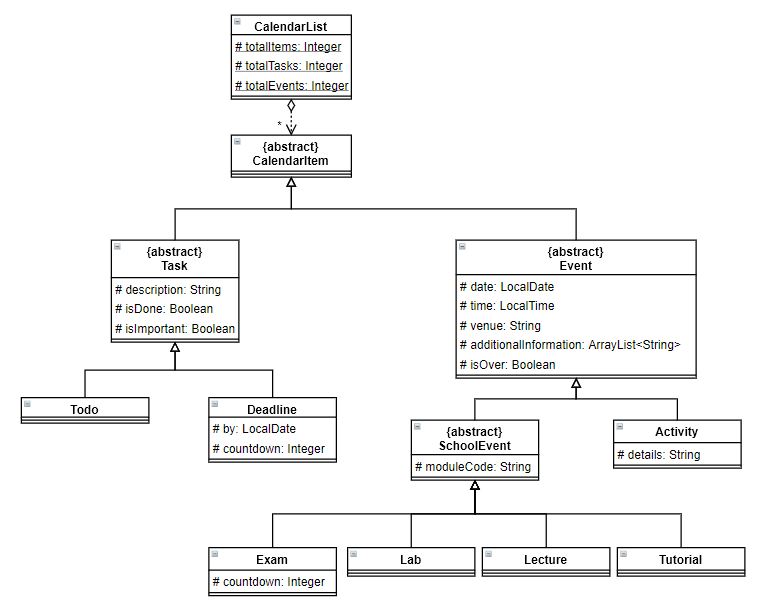
When executing commands,the CalendarItem class updates the information or provides the information of different types of items if needed.
It is split into two subclasses: Task and Event class.
The CalendarList class holds the array of CalendarItem and keeps track of the number of total items, total tasks, and total events.
The Task and Event classes are further explained below.
Task
The Task class stores the information of all task items, including description and status, such as isDone and isImportant.
It has two subclasses: Todo and Deadline. Deadline items also have the date information and countdown for the deadline date, which are not included in Todo tasks.
Event
The Event class stores the information of all Event items, including date, time, venue, status whether it is overdue, and any other information if added.
It has two subclasses: SchoolEvent and Activity. Activity items can have other details.
All SchoolEvent items must have a module code.
Furthermore, the SchoolEvent class has four subclasses which are Lecture, Tutorial, Lab, and Exam. Among them only Exam items have a countdown for the exam date.
Design consideration: SchoolEvent is modelled after classes in NUS to cater to our intended users.
Implementation
This section describes the details of how each feature is implemented.
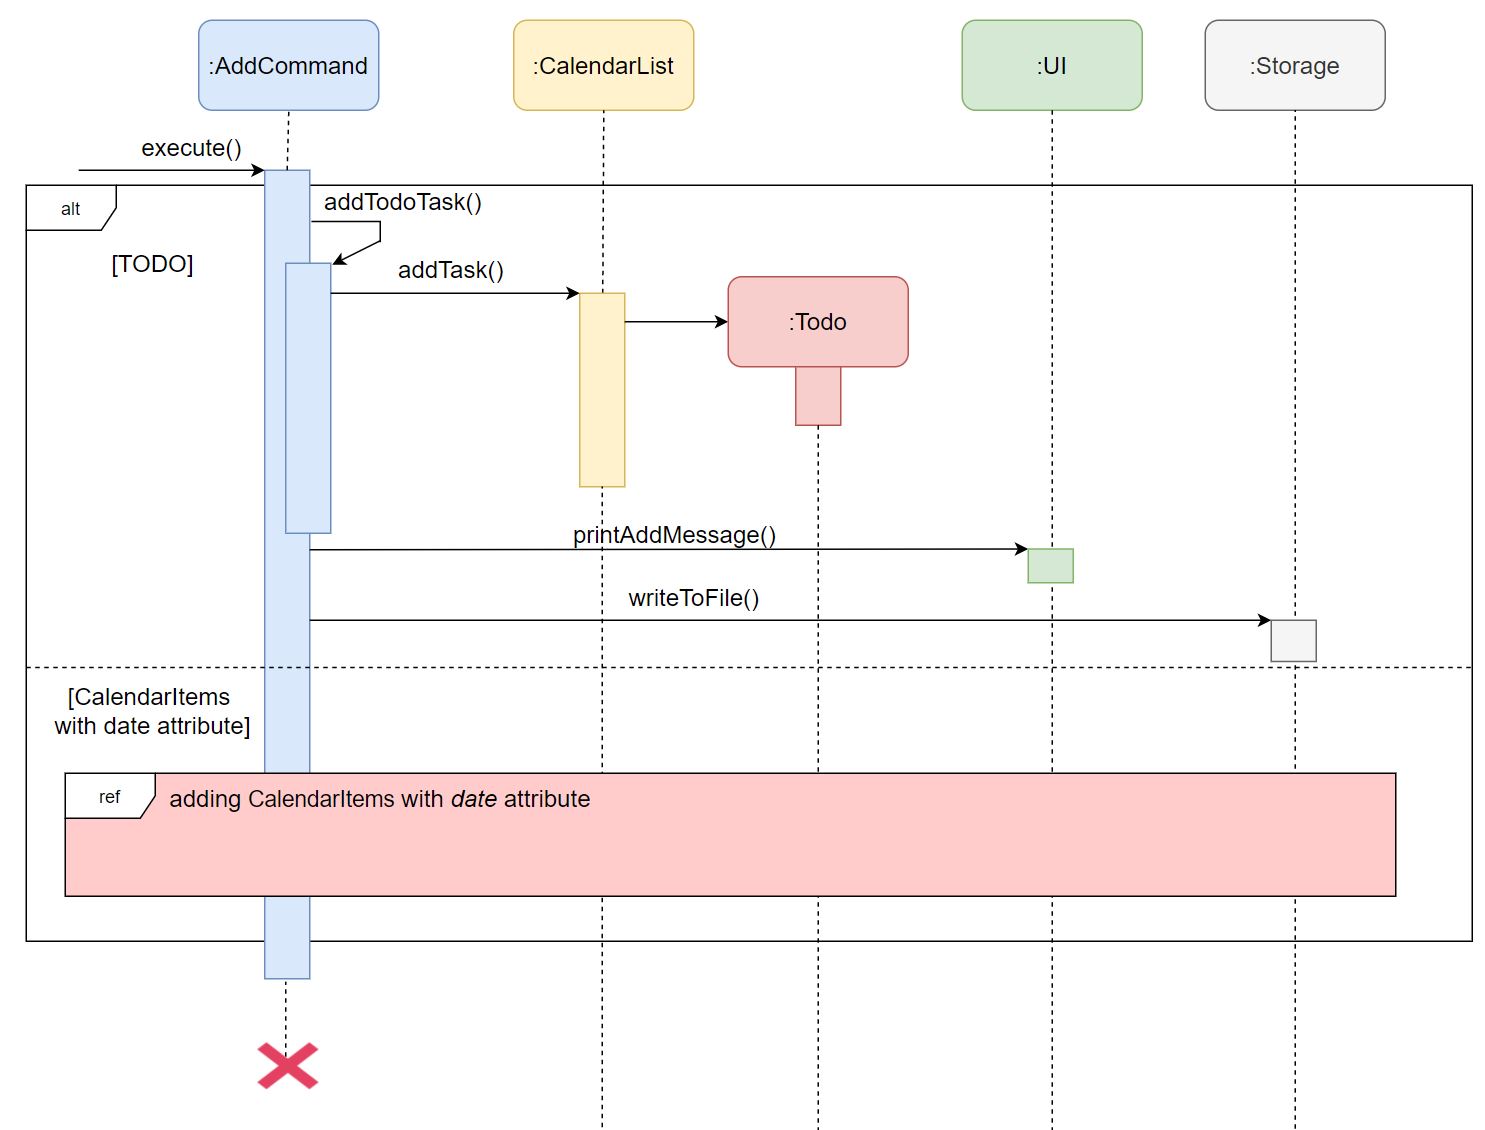
Add a calendar item feature
This feature is facilitated by AddCommand.
The following sequence diagram shows how the execute() operation works to add a Todo item:
The following sequence diagram shows how the execute() operation works to add Activity or Deadline item. A
Deadline item is used as an example.
:
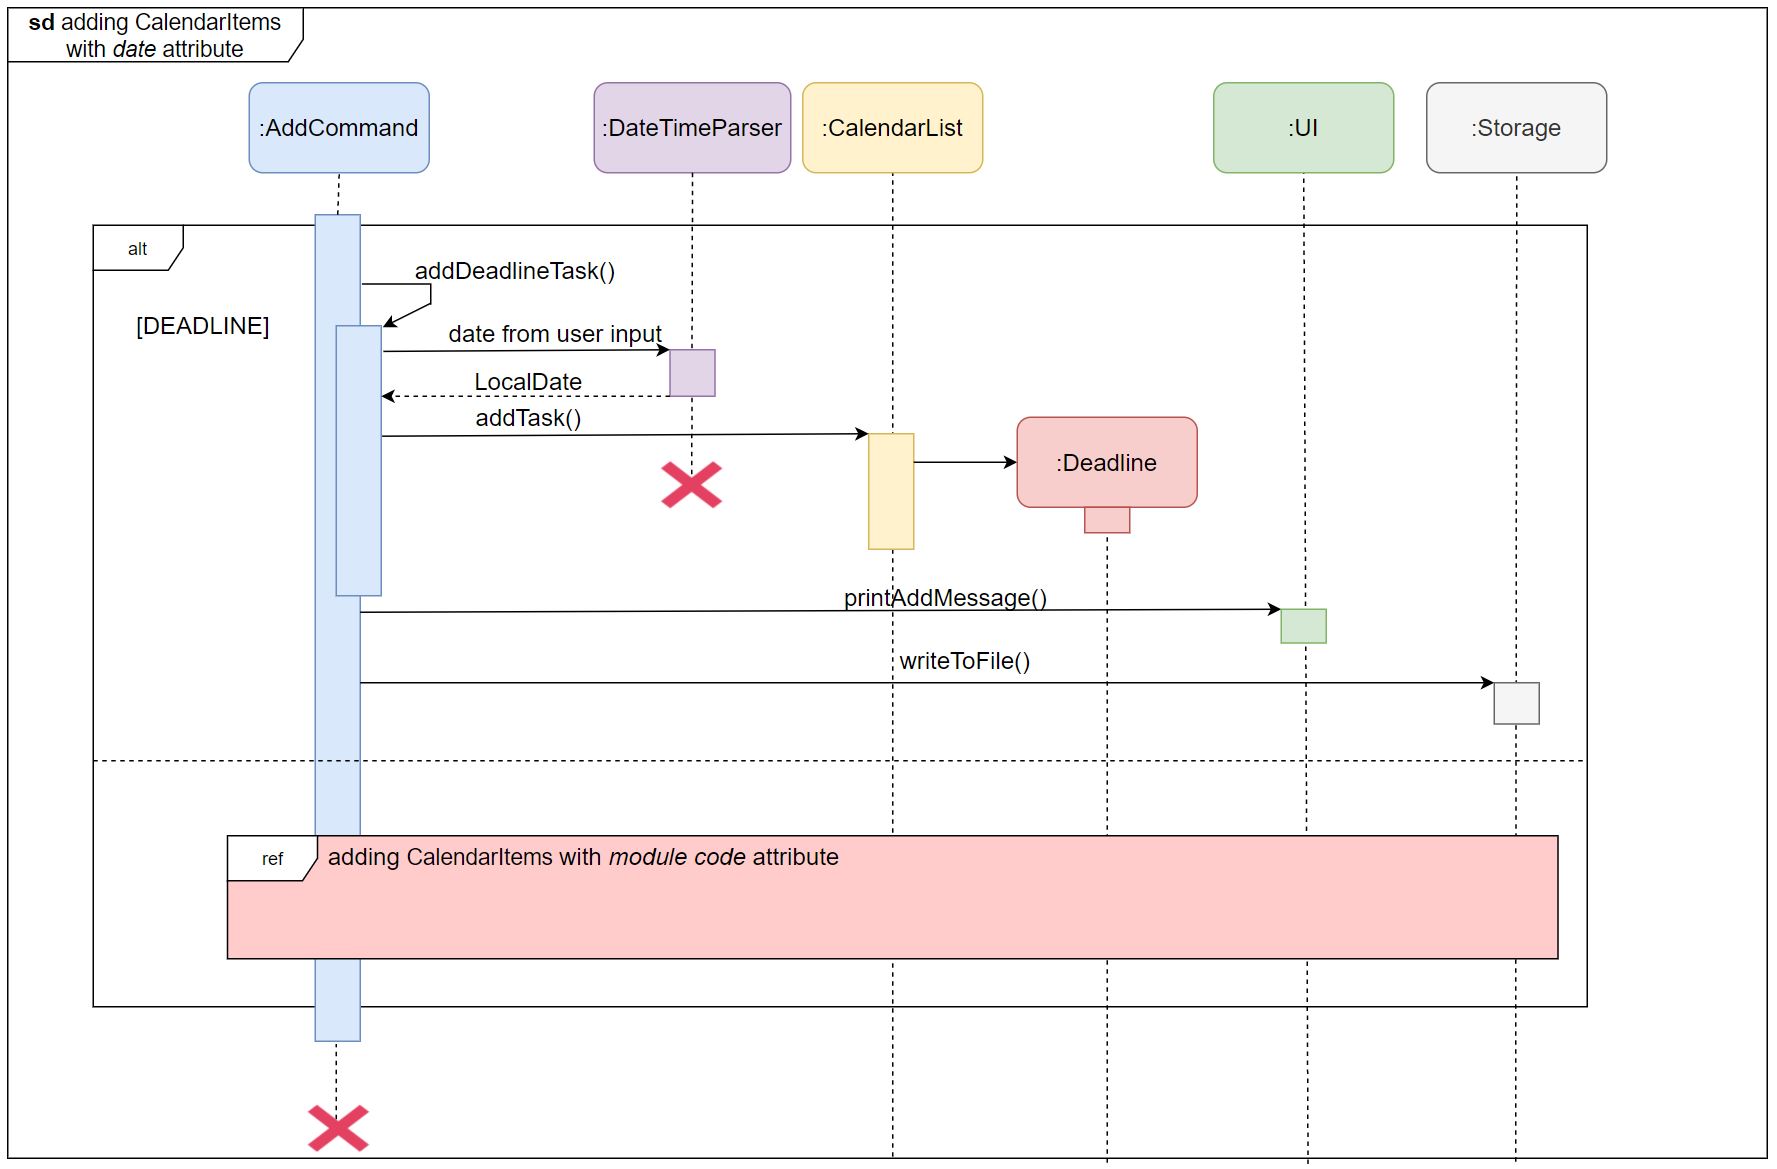
The following sequence diagram shows how the execute() operation works to add aSchoolEvent item. An Exam item
is used as an example.
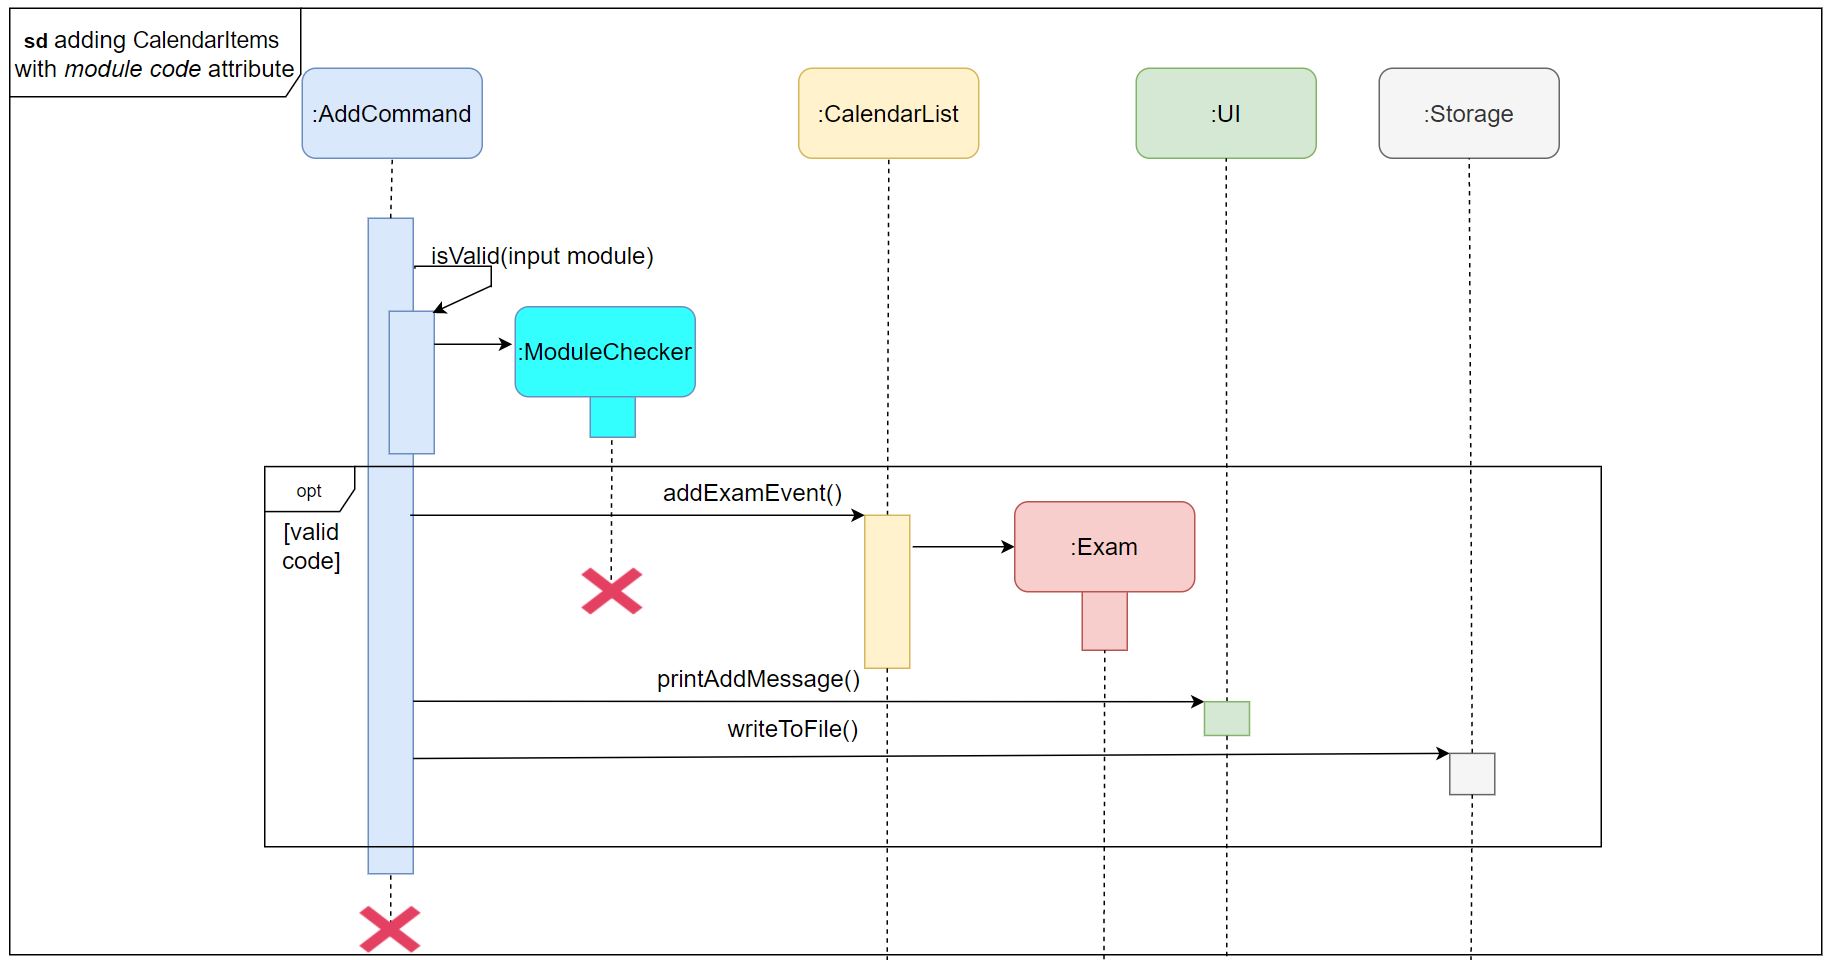
- Note: A self-call to a specific method to add the new
CalendarItemto theCalendarListis done based on the type ofCalendarItembeing added. TheCalendarItemobject created is also based on the type ofCalendarItembeing added.
Check the validity of a module code
This feature is facilitated by ModuleChecker class and NusModule class.
The NusModule class consists of an empty constructor, a getter and setter to retrieve and set the module code of a NusModule object.
The ModuleChecker class has a generateNusModsMap() which generates a HashMap<String, NusModule>. This is achieved by reading
the JSON file from the NUS Mod website and parser it into a list of Module objects.
After which, the isModuleValid function will analyse the module code entered by the user, and returns TRUE if the code is valid, FALSE otherwise.
Mark a task as done feature
This feature is facilitated by DoneCommand.
The following sequence diagram show how the execute() operation works:
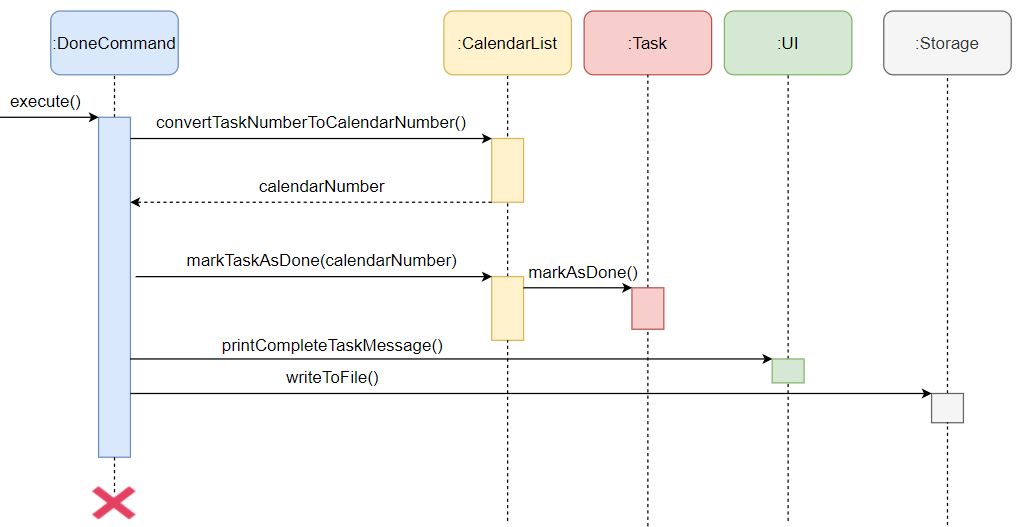
- Note: The command first extracts the task number from the user input prior to
convertTaskNumberToCalendarNumber. There will be a check in the functionmarkTaskAsDone(calendarNumber)to ensure that the calendar item being marked as done is a task.
Additional information of an event feature
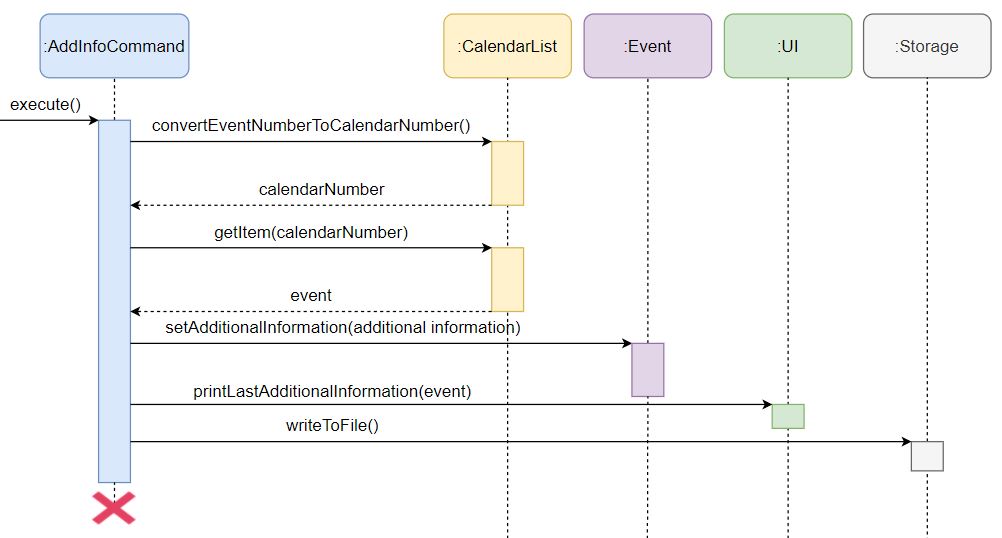
Add additional information
This feature is facilitated by AddInfoCommand.
The following sequence diagram show how the execute() operation of AddInfoCommand works:
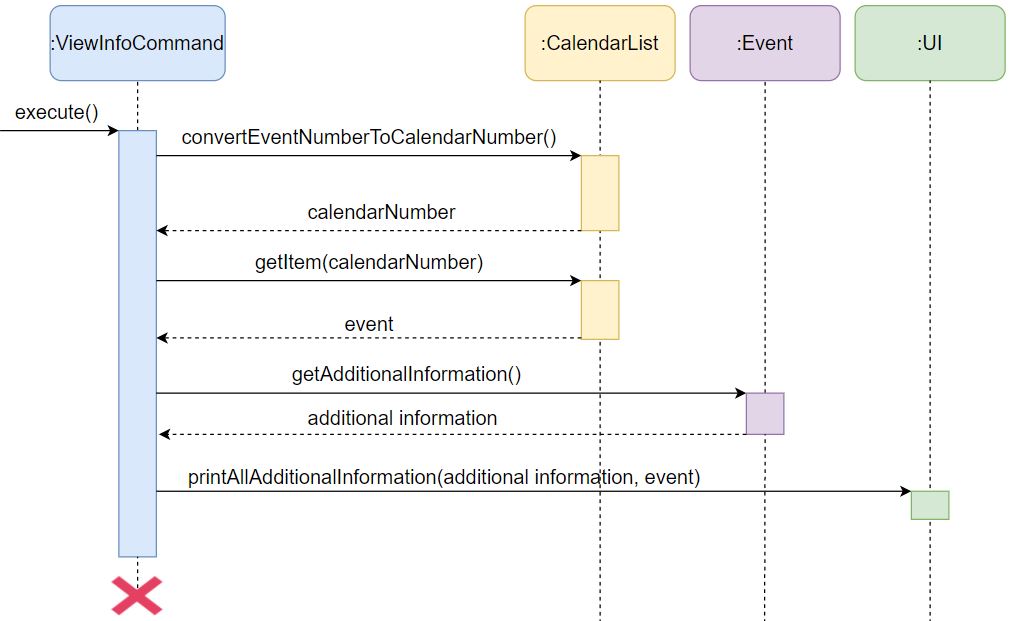
View additional information
This feature is facilitated by ViewInfoCommand.
The following sequence diagram show how the execute() operation of ViewInfoCommand works:
Delete additional information
This feature is facilitated by DeleteInfoCommand.
The following sequence diagram show how the execute() operation of DeleteInfoCommand works:
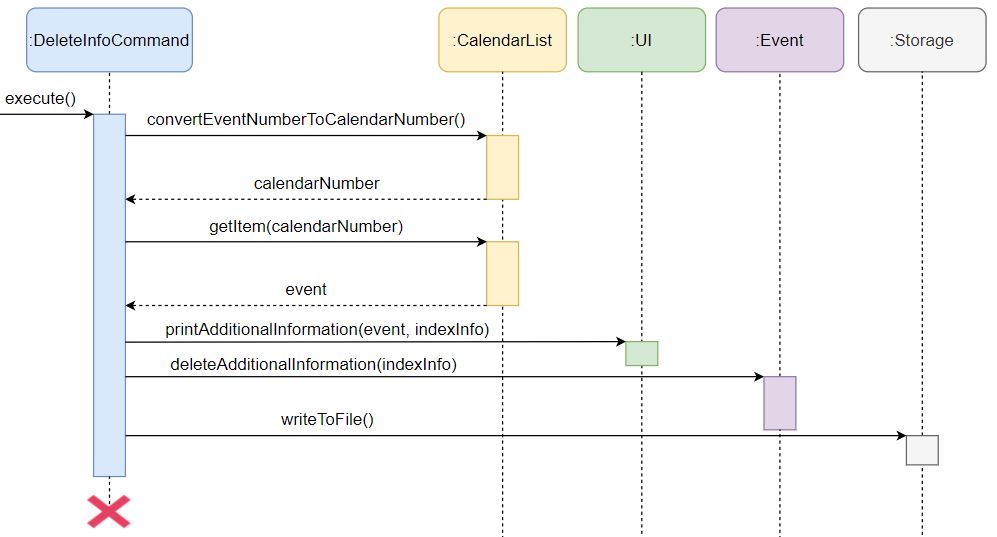
- Note: The commands first extracts the event number from the user input prior to
convertEventNumberToCalendarNumber.
Delete a calendar item feature
This feature is facilitated by DeleteCommand.
The following sequence diagram show how the execute() operation works:
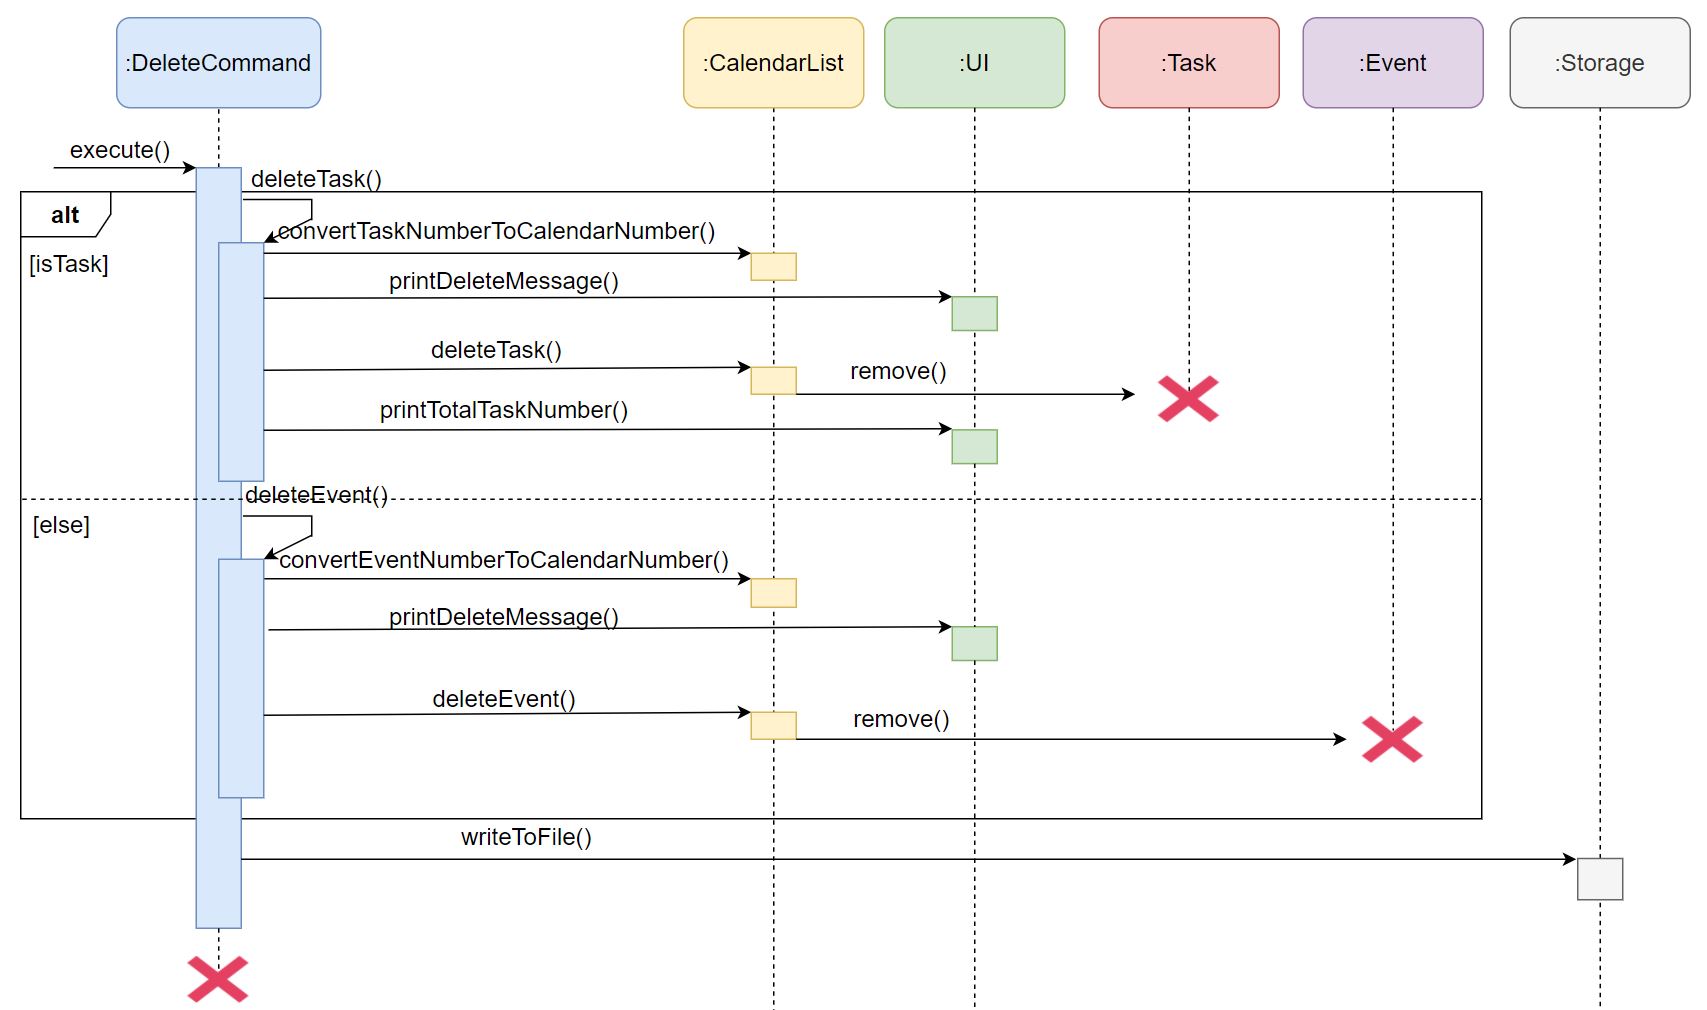
- Note: The command first extracts the task/event number from the user input prior to
convertTaskNumberToCalendarNumberandconvertEventNumberToCalendarNumberrespectively.
Find a calendar item feature
This feature is facilitated by FindCommand.
The following sequence diagram shows how the execute() operation works when the user searches the entire calendar.:
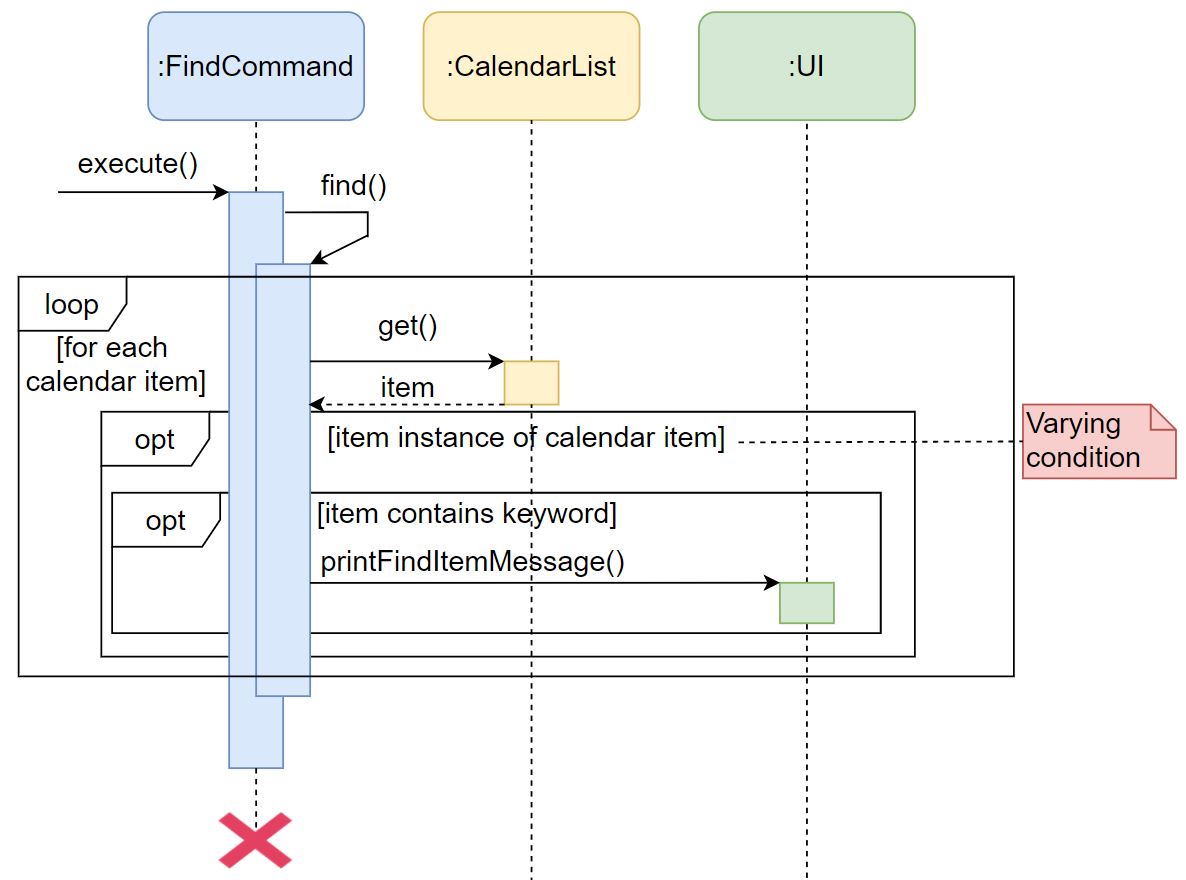
The search for tasks or events feature has a similar sequence diagram with a slight difference to the varying condition. Depending on whether the user searches for tasks or events, the condition will check for the instance of either the task or event respectively.
Prioritize a task feature
This feature is facilitated by PrioritizeCommand.
The following sequence diagram shows how the execute() operation works when the user wants to prioritize a task:
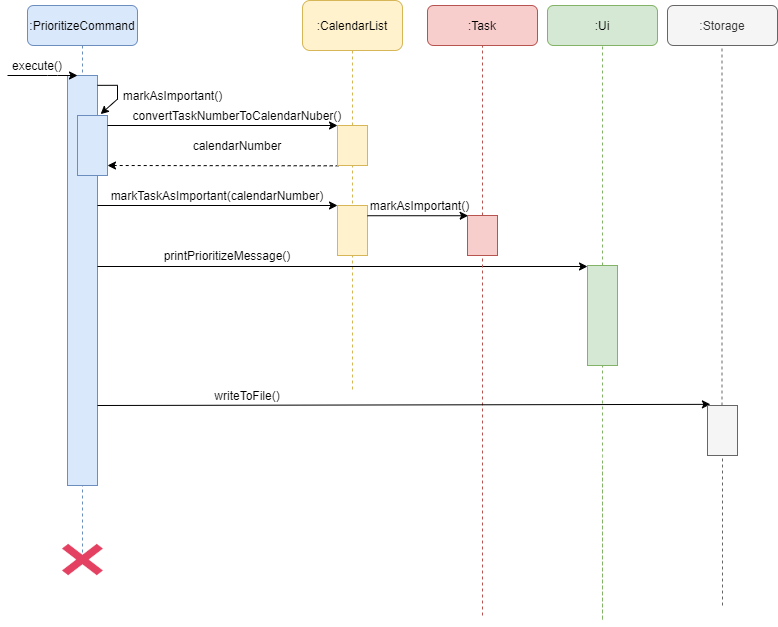
- Note: It first extracts the task number from the user input prior to convertTaskNumberToCalendarNumber.
There will be a check in the function
markTaskAsImportant(calendarNumber)to ensure that the calendar item being marked as important is a task.
Print prioritized tasks feature
This feature is facilitated by PrintPriorityCommand.
The following sequence diagram shows how the execute() operation works when the user wants to print all the prioritized tasks:
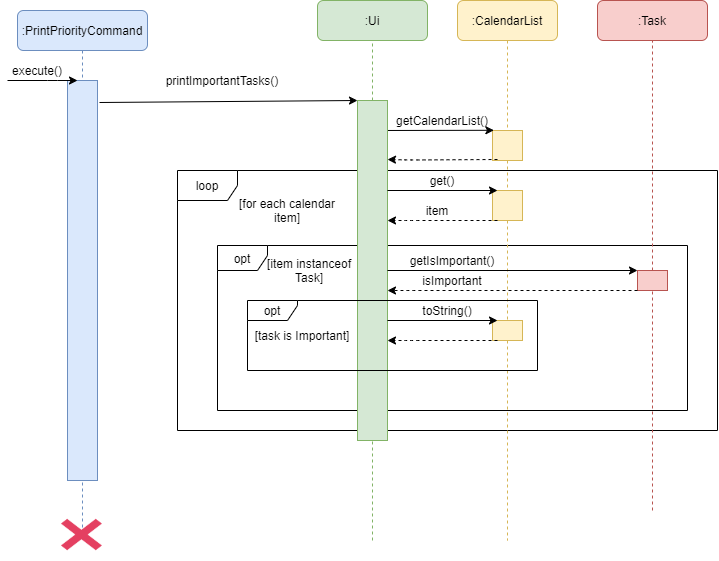
- Note: It uses the
getIsImportant()function of task items to identify whether it is a prioritized task.
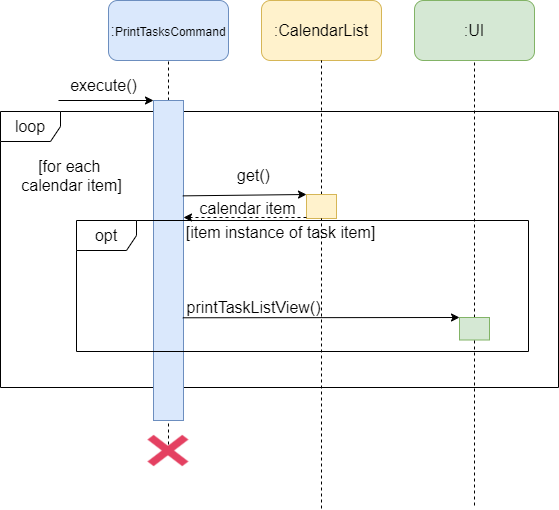
Print tasks feature
This feature is facilitated by PrintTasksCommand.
The following sequence diagram shows how the execute() operation works when the user wants to print the list of tasks stored in the program.
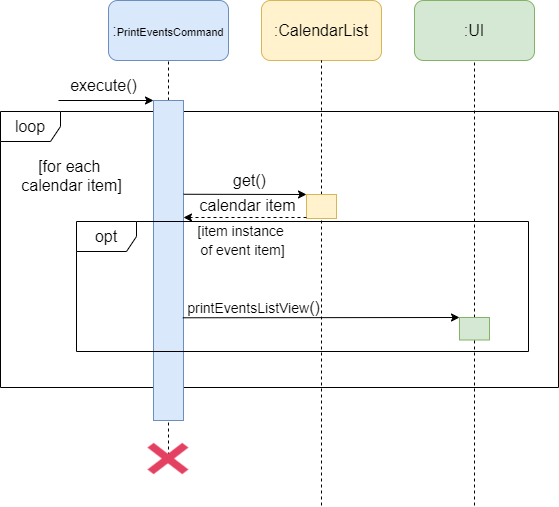
Print events feature
This feature is facilitated by PrintEventsCommand.
The following sequence diagram shows how the execute() operation works when the user wants to print the list of events stored in the program.
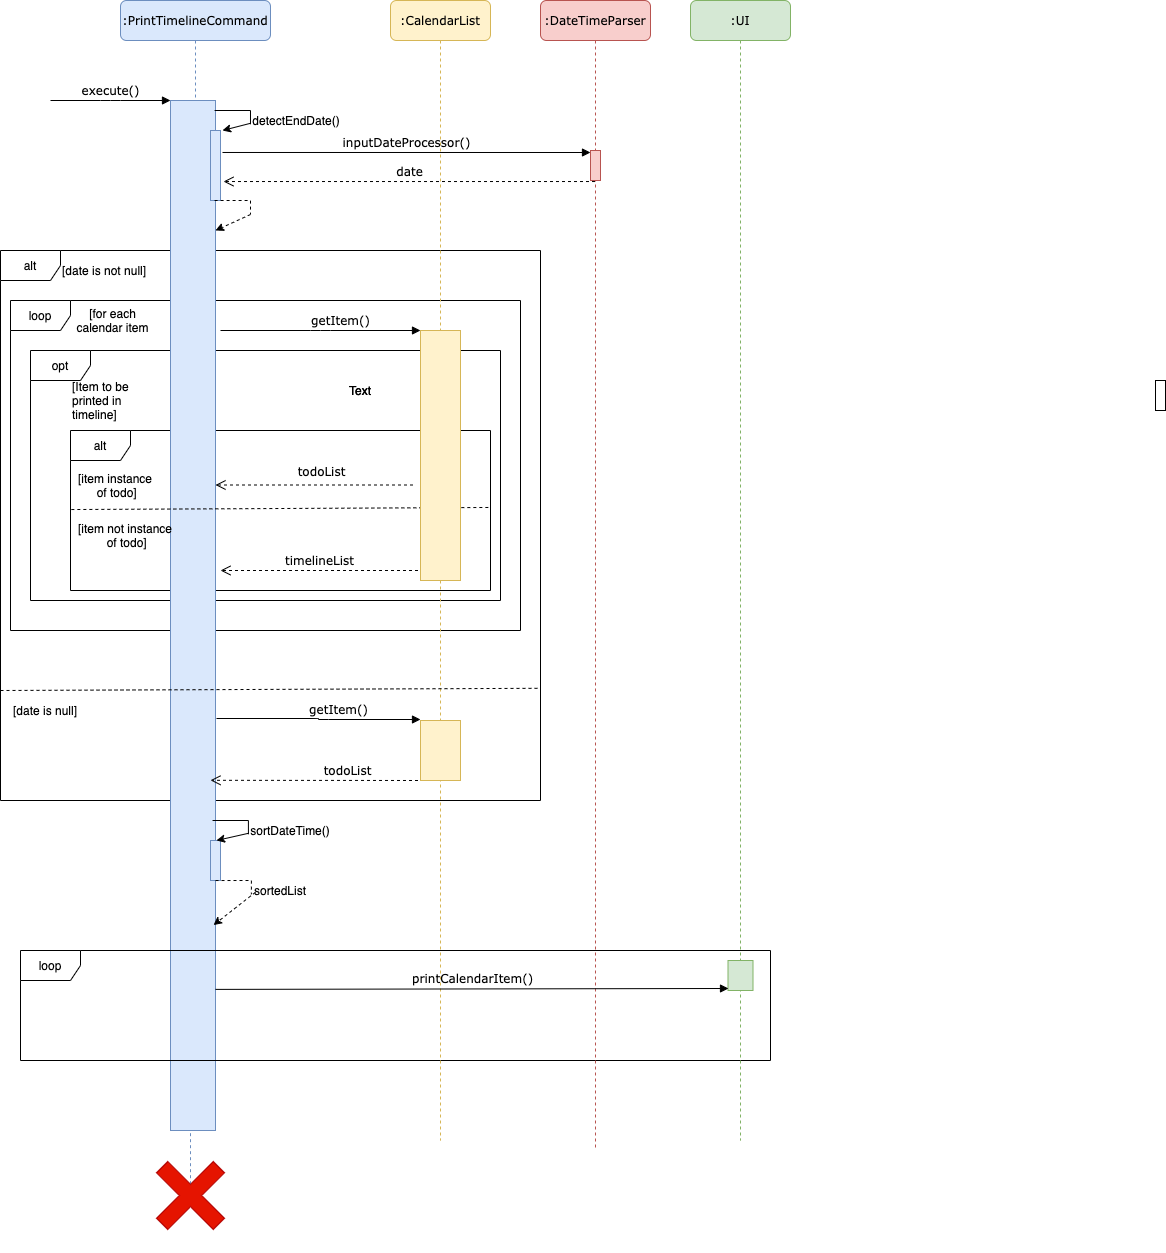
Print personal calendar feature
This feature is facilitated by PrintTimelineCommand.
The following sequence diagram show how the execute() operation works when the user wants to print the personalised calendar:
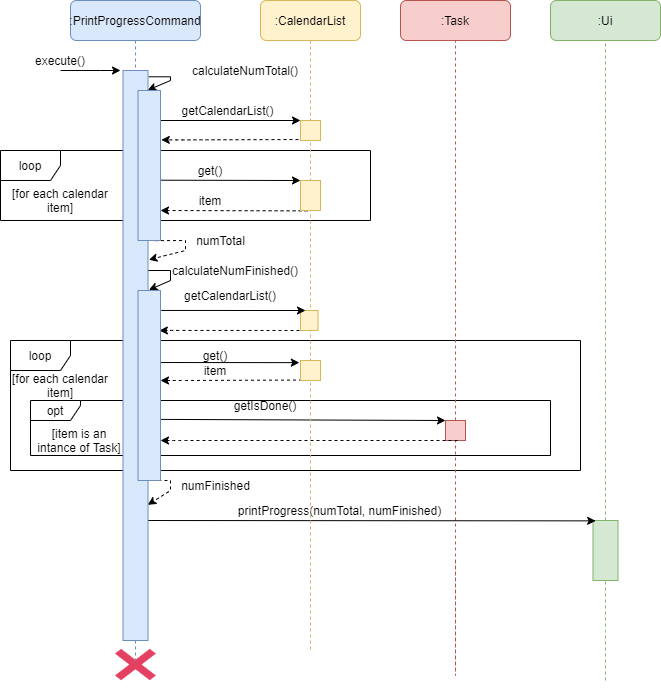
Print progress feature
This feature is facilitated by PrintProgressCommand.
The following sequence diagram shows how the execute() operation works when the user wants to see the progress of all tasks:
Print suggestions feature
This feature is facilitated by PrintSuggestionCommand.
The following sequence diagram shows how the execute() operation works when the user wants to see suggestions about preparing which tasks:
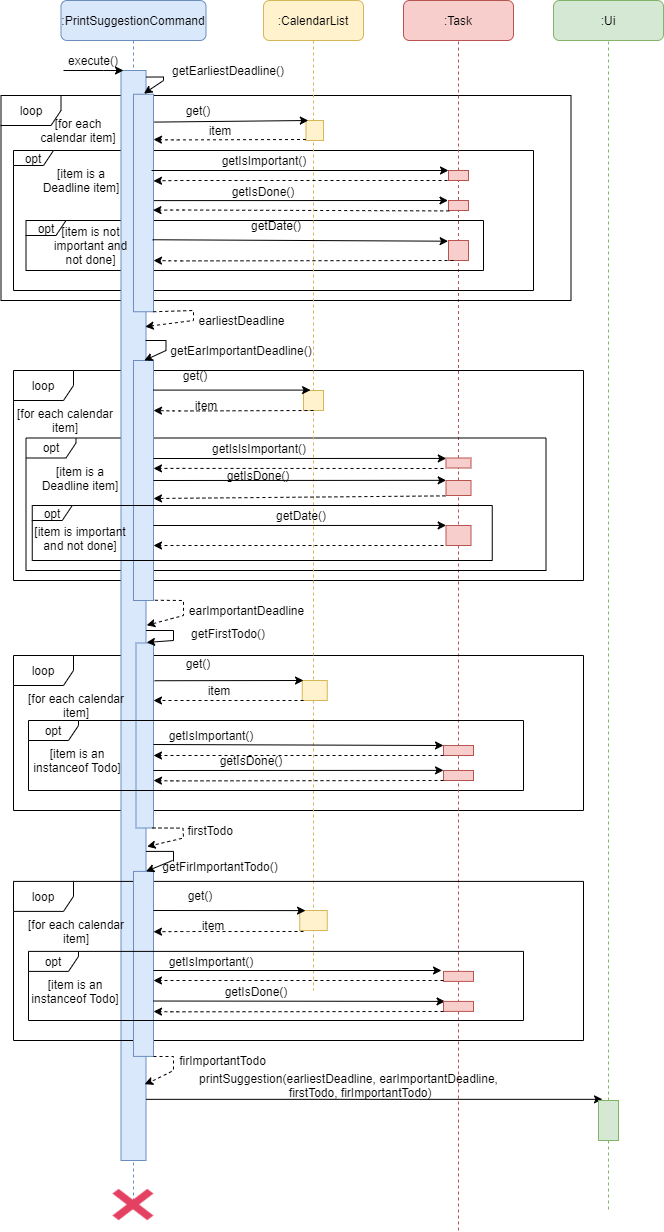
- Note: It uses
getEarliestDeadline()function to get the earliest ordinary deadline in the list, andgetEarImportantDeadline()function to get the earliest important deadline in the list. Similarly, it usesgetFirstTodo()function to get the first added todo task in the list, andgetFirImportantTodo()function to get the first added important todo task in the list. If no corresponding items, the functions will return null. Then it passes the return results to Ui, and Ui prints suggestions with respect to the importance and urgency of them.
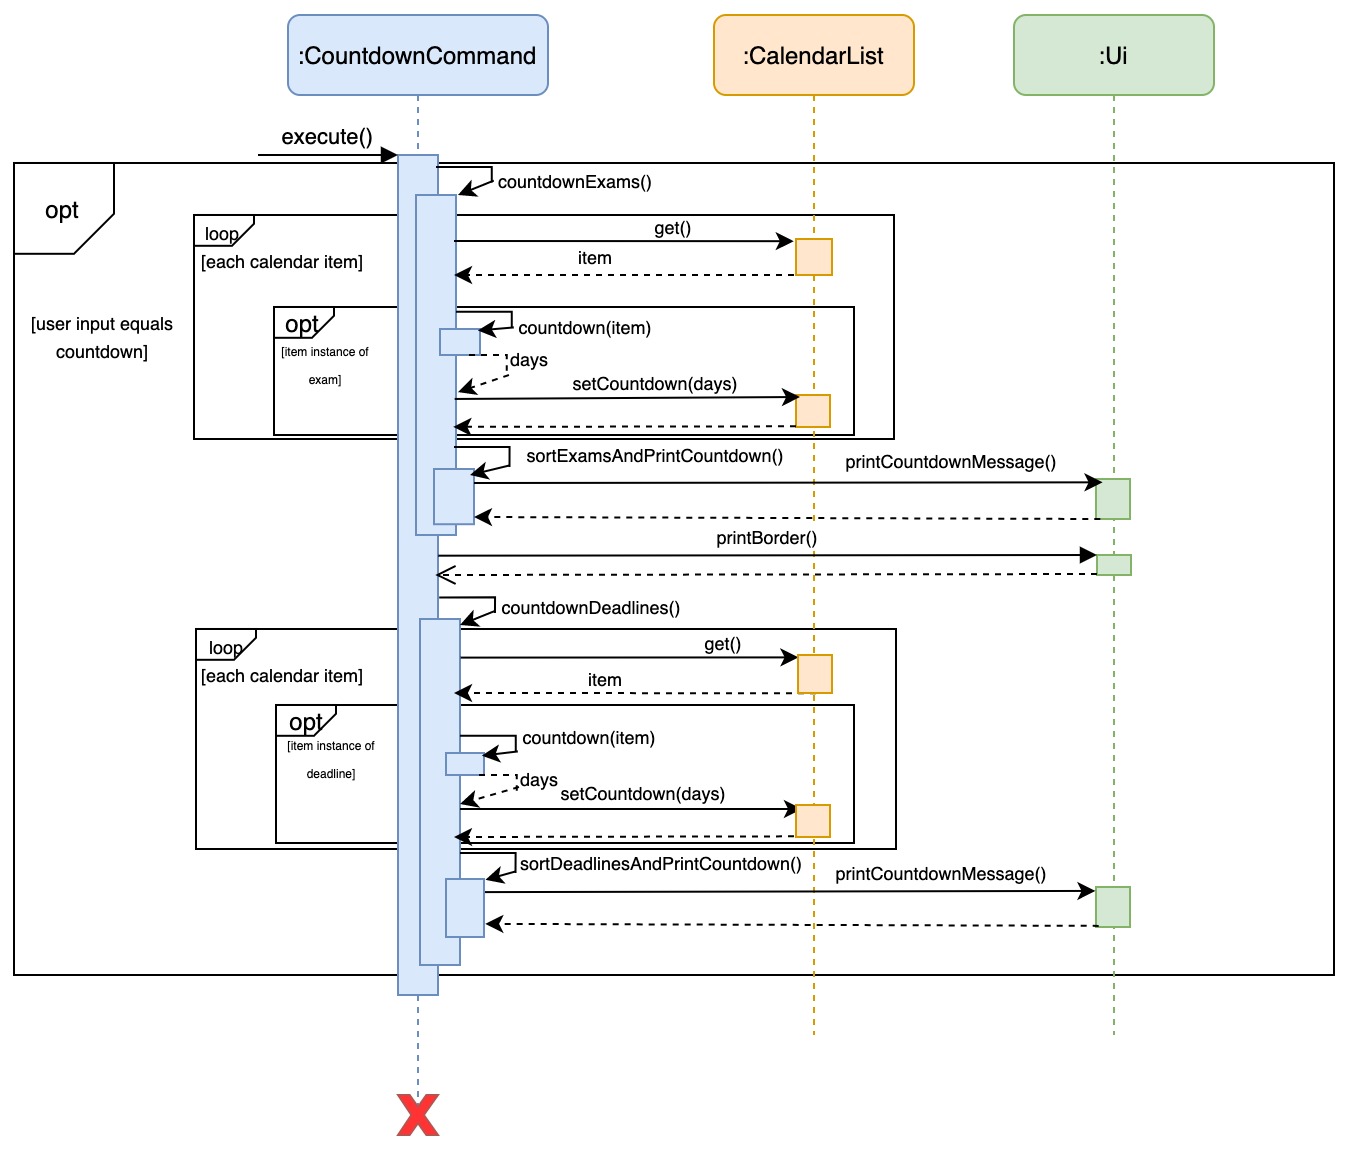
Print countdown feature
This feature is facilitated by CountdownCommand.
The following sequence diagram shows how the execute() operation works when the user decide to see the countdown of exams and deadlines:
The following sequence diagram shows how the execute() operation works when the user decide to see the countdown of exams or deadlines:
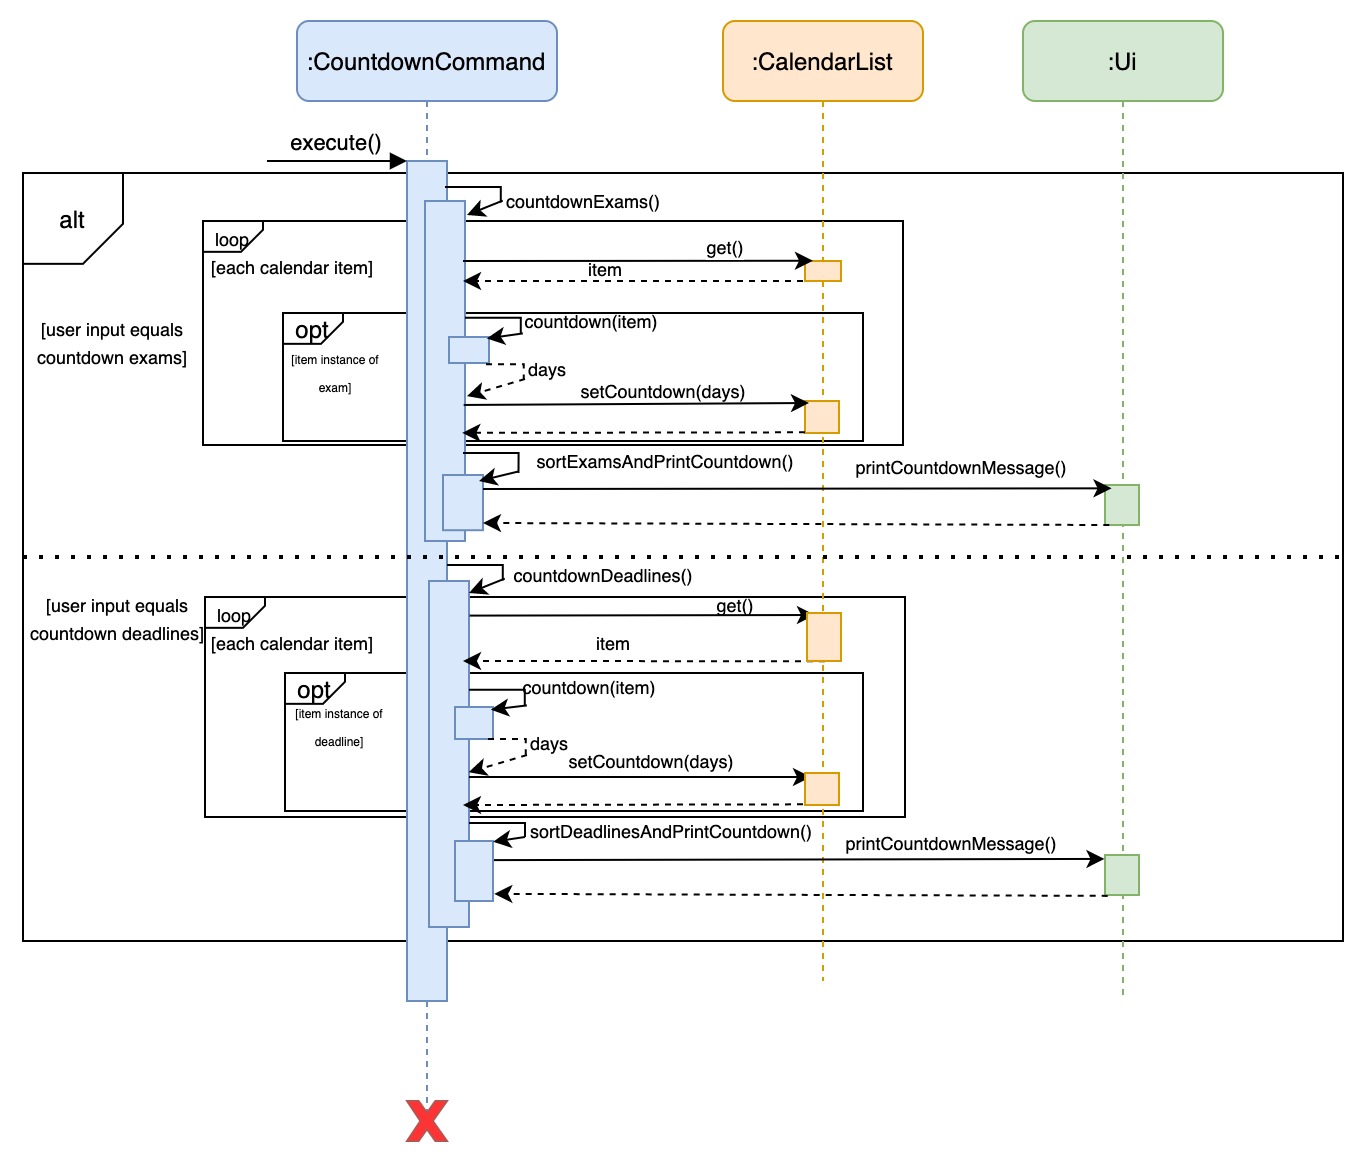
- Note: Before printing the countdown,
countdown()function will calculate the countdown of exams or deadlines, and the countdowns for exams or deadlines will be sorted in ascending sequence by functionsortDeadlinesAndPrintCountdown()orsortExamsAndPrintCountdown()
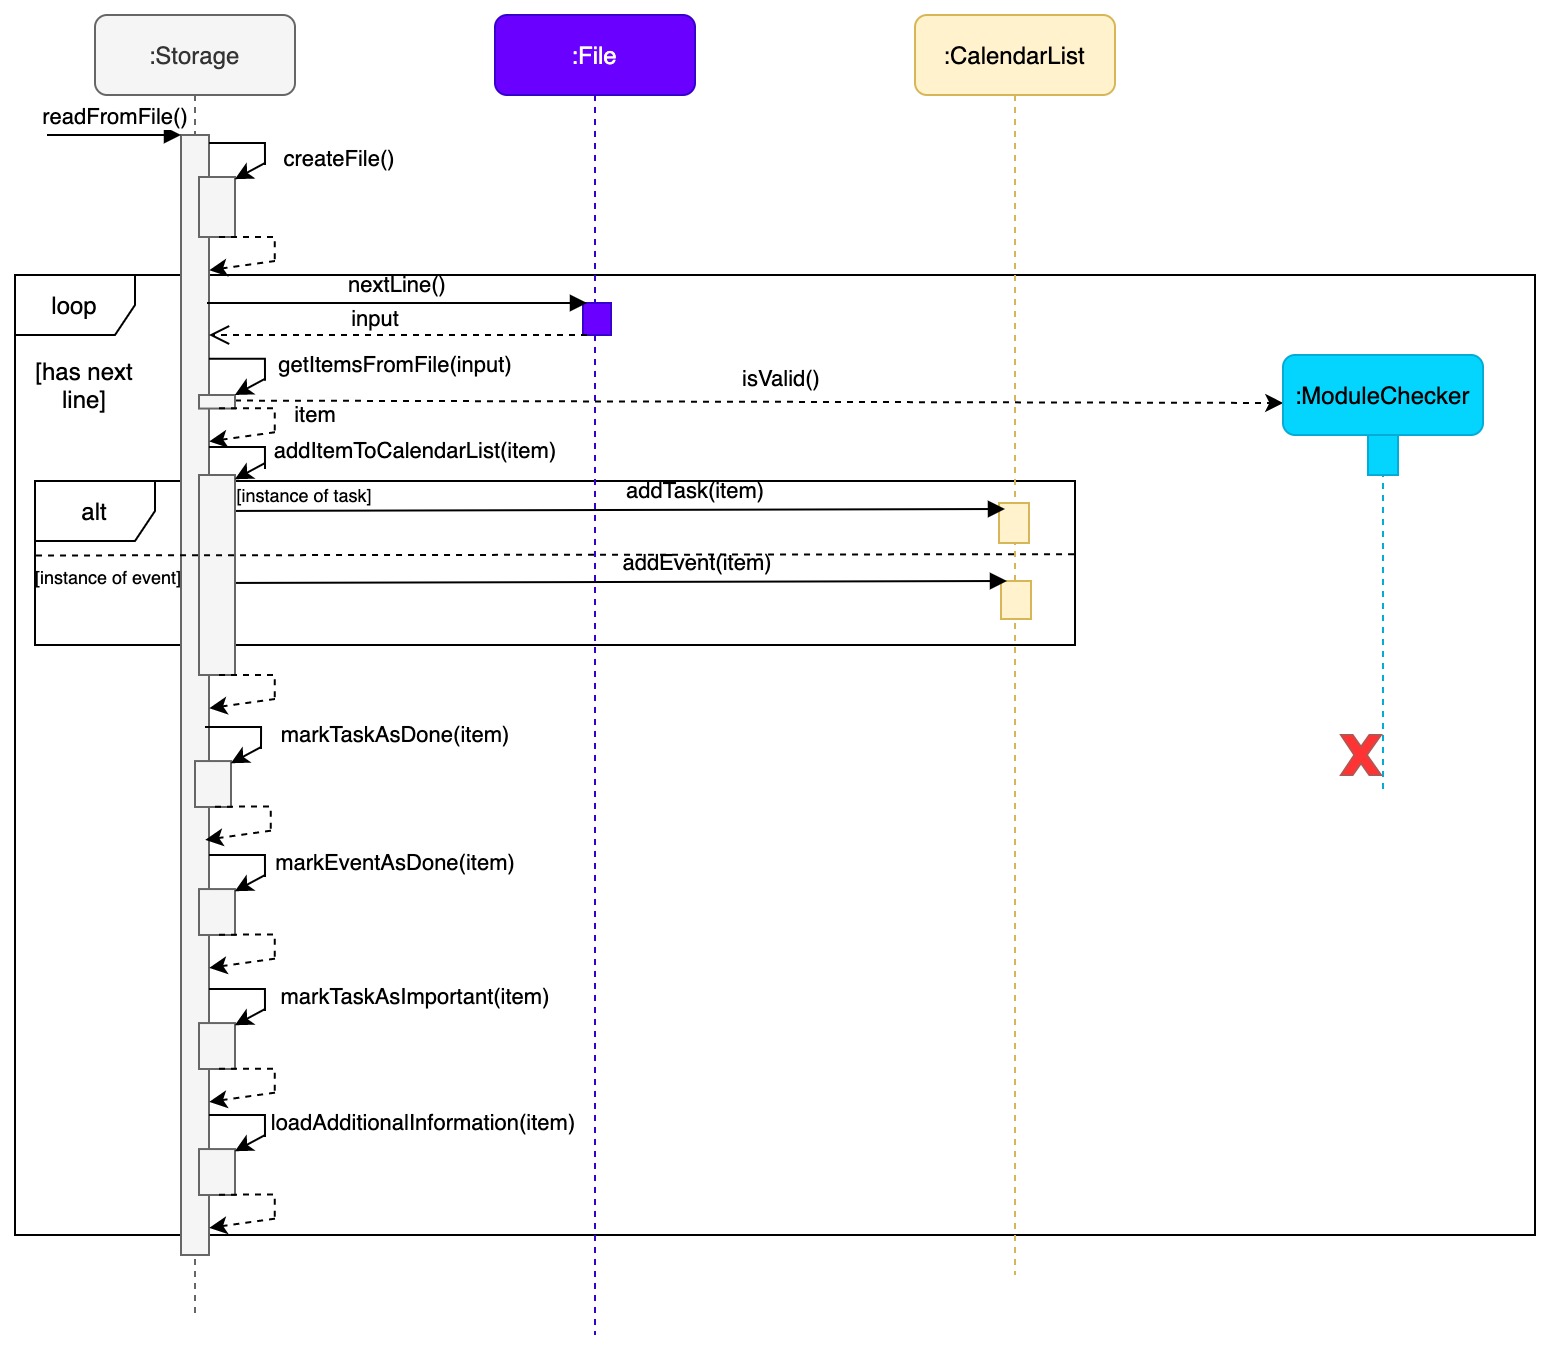
Saving data feature
This feature is facilitated by Storage class and saves the data input by the users automatically into file tasks.txt in /data directory.
The file tasks.txt is loaded when initializing the program by calling the function readFromFile().
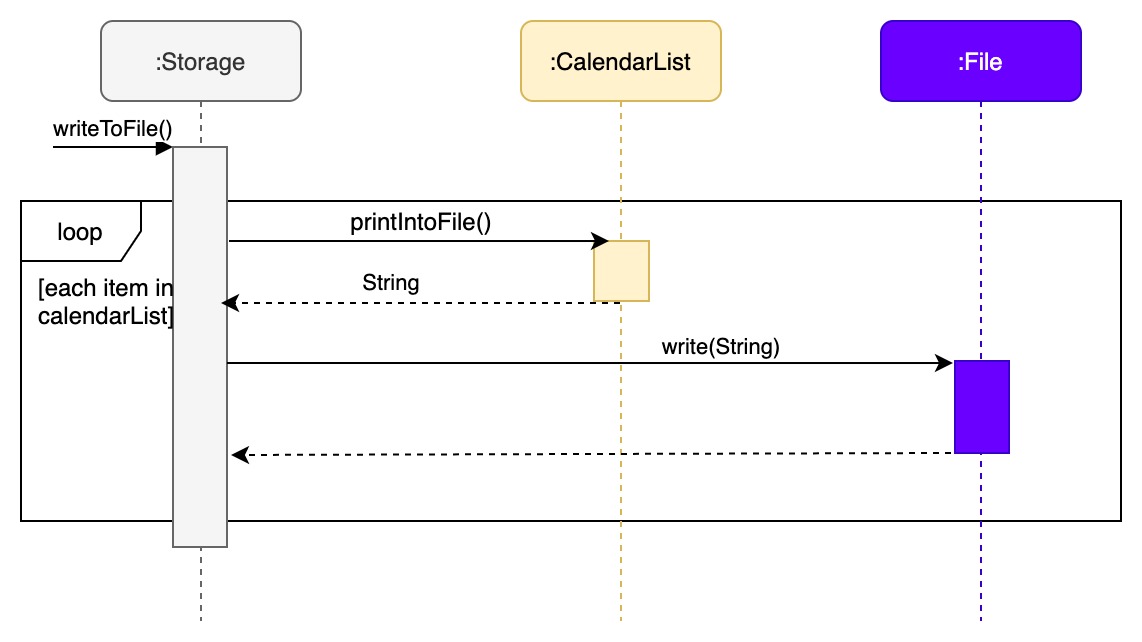
The local file is updated every time when the user adds or deletes an item,
or changes the attributes of the item by calling the function writeToFile().
- Note: if the local file and directory does not exist at the beginning,
createFile()will be called to create a new directory, and a new text file.
Documentation
This section shows how the developer guide is documented.
Documentation guide
We use Markdown for writing documentation.
Setting up and maintaining the project website
- We use Intellij's inbuilt markdown editor to maintain our documentations of this project
- And also the Cayman to manage documentation.
- The docs/ folder is used for documentation.
Style guidance
- Follow the Google developer documentation style guide.
- Also relevant is the [se-edu/guides] Markdown coding standard
Editing diagrams
- We use diagrams.net to draw UML diagrams used in this document.
Converting a document to the PDF format
- We use Google Chrome for converting documentation to PDF format.
- Here are the steps to convert the project documentation to PDF format:
- Go to your generated documentation site on GitHub using Chrome.
- Within Chrome, click on the Print option in Chrome’s menu.
- Set the destination to Save as PDF, then click Save to save a copy of the file in PDF format.
- See the guide [se-edu/guides] Saving web documents as PDF files for more details.
Testing guide
There are two ways to run tests.
- Method 1: Using IntelliJ JUnit test runner
- To run all tests, right-click on the src/test/java folder and choose Run Tests in
tp.test - To run a subset of tests, you can right-click on a test package, test class, or a test and choose Run
DukeTest
- To run all tests, right-click on the src/test/java folder and choose Run Tests in
- Method 2: Using Gradle
- Open a console and run the command
gradlew checkstyleMain(Mac/Linux: ./gradlew checkstyleMain)
- Open a console and run the command
DevOps guide
Build automation
This project uses Gradle for build automation and dependency management. You are highly recommended to read this Gradle Tutorial from the se-edu/guides.
Given below are how to use Gradle for some important project tasks.
-
clean: Deletes the files created during the previous build tasks (e.g. files in thebuildfolder). e.g../gradlew clean -
shadowJar: Uses the ShadowJar plugin to creat a fat JAR file in thebuild/libfolder, if the current file is outdated. e.g../gradlew shadowJar -
run: Builds and run the program.runShadow: Builds the application as a fat JAR, and then runs it. -
checkstyleMain: Runs the code style check for the main code base.checkstyleTest: Runs the code style check for the test code base. -
test: Runs all tests.-
./gradlew test- Runs all tests -
./gradlew clean test- Cleans the project and runs tests
-
Continuous integration
This project uses GitHub Actions for CI. The project comes with the necessary GitHub Actions configurations files
(in the .github/workflows folder). No further setting up required.
Make a release
Here are the stpes to create a new release after you have implemented new features.
- Update the version number in
Main.java. - Generate a fat JAR file using Gradle (i.e.
gradlew shadow). - Tag the repo with the version number e.g:
V2.1. - Create a new release using Github.
- Upload the JAR file you created.
Appendix A: About the product
This section provides a description of the product.
Product scope
25HoursADay is a task scheduling program optimized for use via a Command Line Interface (CLI) while still having the benefits of a Graphical User Interface (GUI). It serves as a one-stop application for the users to keep track of their tasks, events and any It is specially catered to NUS students, offering features relevant to a NUS student.
Target user profile
- NUS student
- has the need to manage a significant number of day-to-day matters
- prefer desktop command line apps over other types
- prefer typing to using mouse interactions
- comfortable with using command line applications
- forgetful person who needs reminders
- a fast typer
Value proposition
By using 25HoursADay, it provides an all-in-one application for the users to keep track of his/her day-to-day matters. Without the need to search through different platforms for information, 25HoursADay can manage one's day-to-day matters faster than a typical mouse/GUI driven application.
Appendix B: User Stories
This section describes the user stories considered when implementing the features.
| Version | As a ... | I want to ... | So that I can ... |
|---|---|---|---|
| v1.0 | new user | see usage instructions | refer to them when I forget how to use the application |
| v1.0 | user | add different tasks and events | better manage my day-to-day matters |
| v1.0 | user | set my tasks as done | track my tasks better |
| v1.0 | user | delete my calendar items | remove unwanted items and organise my calendar better |
| v1.0 | user | print all events and tasks separately | have a clear picture of what I have on hand |
| v1.0 | user | see my progress of tasks | know the percentage of tasks I have finished and adjust my working pace |
| v1.0 | user | store all the data locally | load my saved data to the app next time |
| v2.0 | user | find an item in my calendar | locate an item without having to go through the entire list |
| v2.0 | NUS student | add information about my classes | locate all the information about my class on this app |
| v2.0 | NUS student | delete information about my classes | can keep the information about my class relevant at all times |
| v2.0 | user | mark my tasks as important | distinguish important tasks and the ordinary tasks |
| v2.0 | user | print calendar in timeline format | have a visual overview of all the items I have |
| v2.0 | user | print timeline before a certain date | have an overview of current tasks and better manage my time |
| v2.0 | user | get some suggestions when I do not know what to do | prepare for important and urgent tasks first |
| v2.0 | NUS student | add my school events recursively | save my time typing out the events one by one |
| v2.0 | NUS student | see the exam and deadline countdown | be conscious about the coming exams and deadlines and manage my time more wisely |
Appendix C: Non-Functional Requirements
- The program should work on any mainstream OS as long as it has Java 11.0.8 or above installed.
- The program should be able to hold up to 1000 tasks without a noticeable slowness in performance for typical usage.
- A user with an above average typing speed for regular English text (e.g not code, not system admin commands) should find it handy to use command lines rather than using the mouse.
- The program should be able to detect all NUS modules, provided there is proper connection established between the program and the NUS Mods API.
{Give non-functional requirements; More to add}
Appendix D: Glossary
- Task - a todo item or a deadline item.
- School event - a lecture, tutorial, lab session or an examination.
- Event - an activity or a school event.
- Calendar item - a task or an event.
- Task list - a list that stores all the tasks added to the app.
- Event list - a list that stores all the events added to the app.
- Calendar list - a list that stores all the calendar items added to the app.
Appendix E: Contact the initial developers
The table below shows the information and contact details of developers.
| Developer | Contact details |
|---|---|
| Liu Jingming | E0424608@u.nus.edu |
| Liu Yifeng | E0425960@u.nus.edu |
| Lyu Jiawen | E0376928@u.nus.edu |
| Ng Hong Ming | E0426149@u.nus.edu |
| Zhang Yilin | E0377000@u.nus.edu |
Appendix F: Instructions for manual testing
General steps for manual testing:
- Execute an "Add" action.
- Execute a "Delete" / "Find" / "Print" / "Set" / "View" action of the same command type.
Printing the countdown of exams
-
Prerequisites: add some
examevents into thecalendarList. -
Test case:
countdown examsExpected: The countdown of the exams will be calculated for you. And the countdown of all upcoming exams will be printed.
-
Test case:
countdown 12345678Expected: No countdown will be calculated and printed. Error details will be shown in the exception message given to you.
Refer to Command Summary to view the list of actions, command types and command format.
Refer to User Guide to view the other commands and their expected output.
Command summary
The following table contains the list of commands available in the application.
| Term | Meaning | Command Format |
|---|---|---|
| Add | activity event | act <activity_description> @<venue> / <date> <time> |
| Add | additional information for an event | /a <event_number> - <additional_information> |
| Add | deadline task | deadline <task_description> / <due_date> |
| Add | exam event | exam <module_name> @<venue> / <date> <time> |
| Add | lab event | lab <module_name> @<venue> -r <recurring_number> / <date> <time> |
| Add | lecture event | lect <module_name> @<venue> -r <recurring_number> / <date> <time> |
| Add | todo task | todo <task_description> |
| Add | tutorial event | tut <module_name> @<venue> -r <recurring_number> / <date> <time> |
| Delete | additional information for an event | /- <event_number> a <additional_information_number> |
| Delete | events | -e <event_number> |
| Delete | tasks | -t <task_number> |
| Find | all calendar items | /f <keyword> |
| Find | events | /fe <keyword> |
| Find | tasks | /ft <keyword> |
| countdown for all items | countdown |
|
| countdown for deadlines | countdown deadlines |
|
| countdown for exams | countdown exams |
|
| events | print events |
|
| important tasks | print * |
|
| progress | print progress |
|
| tasks | print tasks |
|
| timeline (default) | print timeline |
|
| timeline before a date | print timeline date <date> |
|
| timeline for the next 31 days | print timeline month |
|
| timeline for the next 7 days | print timeline week |
|
| Quit | exit the application | bye |